


How I got this picture - David Allen Posted On 20th September 2018 To How I got this picture

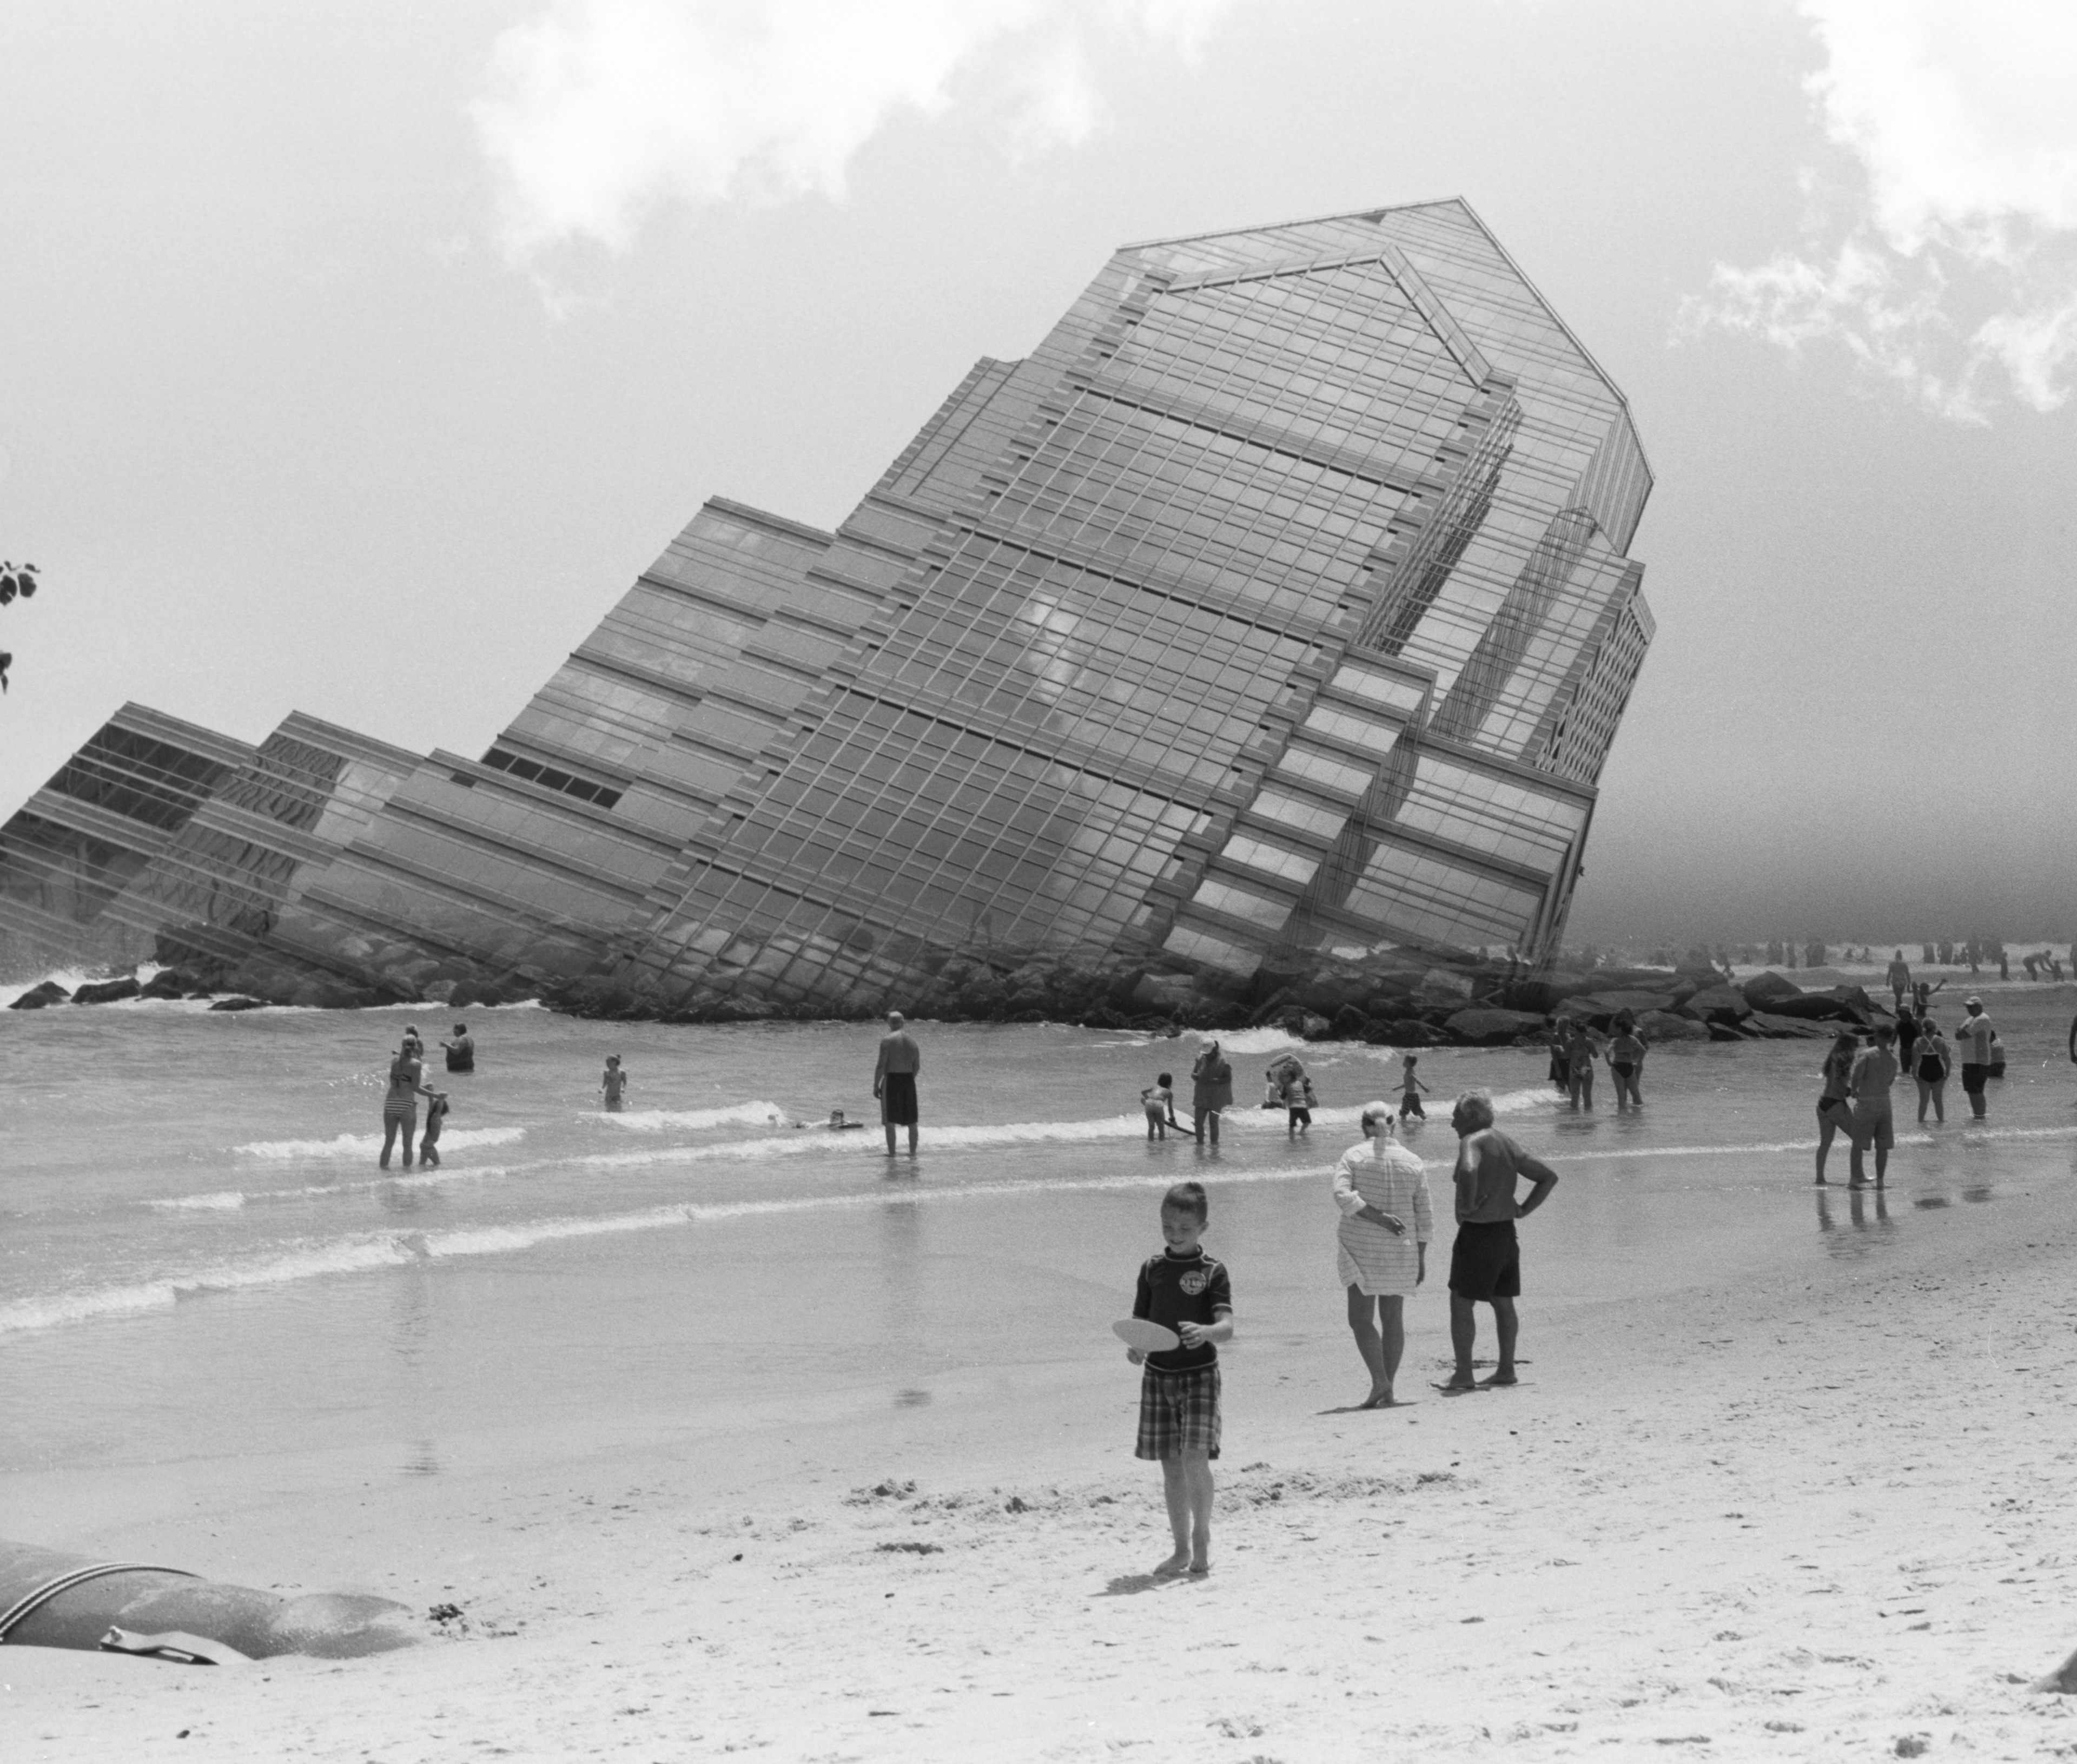
Crumble
We always enjoy finding out the stories behind some of the images that you share with us and we couldn't resist asking David Allen about this image.
Technical Info
Film Used: Ilford HP5 PLUS
Format: 120 (6x7)
Camera: Mamiya RB 67 Pro-S
Lens: 90mm/3.8 Mamiya Sekor
Exposure time: 1/100
Other equipment: Changing bag with an extra 120 spool.
Location:
Top—Philadelphia, PA | Bottom—Bradley Beach, NJ
Firstly, tell us the story behind this image. What inspired you to shoot it?
Every year in Toulouse, France (where I live), there is an environmental documentary film festival, Festival FReDD . I was invited to exhibit for the 2017 festival, with the theme “Oceans and Seas.” So, I came up with the concept for this series, Reclamation,” as a commentary on climate change
While Crumble wasn’t one of the original Reclamation photos, I decided that the series was worth continuing after a positive response. So, the next time we visited Philadelphia, I determined to shoot three rolls of Reclamation photos using a friend’s RB67.
(You can read more about the series in the upcoming issue of Let’s Explore Magazine)
Did you come across any challenges?
The original Reclamation photos were shot on 35mm, using pre-fabricated Cokin splitters (to block the lens for the double exposure). To use the RB, I made my own splitter with a rubber lens hood. Fortunately, I have access to an RB67 in France; so I was able to make the splitter and test it before flying to Philadelphia.
Testing splitters is important. If they go ever-so-slightly past the center of the lens, you’re left with a dark band on your photo; if they don’t quite make it, you have a white band.
What process did you use
The photo is handheld with the RB67. First, I went into Philadelphia with the splitter covering the bottom half of my lens and shot the tops of certain buildings, skyscrapers, and even a couple sculptures, making sure that there was only sky behind them (at least, in the top half of the frame—the only half that mattered).
When using splitters, you control the “fade” between your two exposures by depth of field. The shallower your depth of field, the more the splitter blurs, and the more fade you get. So, for these shots, where I want the buildings to end abruptly in the ocean, it was necessary to shoot at f/32. Therefore, I chose HP5 PLUS—a faster film allowed me to shoot at that aperture handheld on a sunny day.
Then, in my changing bag, I respooled the roll, so that I could reload it to shoot the bottom at the beach. Because it’s impossible to perfectly align the spool when reloading, the finally negatives have black lines on the sides from the subtle misalignment between the tops and the bottoms of negatives. The 6x7 format gives a lot more leeway in terms of cropping than 35 mm, so I was glad to have the larger format.
The great part about shooting on a sunny day was that I could meter using the sunny 16 rule… which I did. At two stops from f/16, I was left with a shutter speed of 1/100 which is basically the limit with the 90mm lens handheld.
When you take double exposures, dark areas of one exposure let the other exposure come through. When I saw the rock jetty at the beach, I though “Perfect!” The shiny building blends into the rock right at the splitter to make it look like the building is crumbling into the ocean (hence the title). When I took the photo I prayed that my alignment hadn’t been too far off when reloading the roll!
How did you process it?
I processed the photo in Rodinal at Jon Wilkening’s house (http://jonwilkening.com/). He’s a long-time friend and film shooter who, fortunately, lives right outside of Philadelphia. This allowed me to develop my photos before returning to France.
The Rodinal brings out the grain, which I think works well with the subject and message.
What about printing?
Unfortunately, the negatives for two out of the three Reclamation rolls I shot in Philadelphia were lost in transit. Of all the photos I’ve ever shot, Crumble might be the one I’ve most wanted to print in my darkroom. Sadly, its negative is among those lost.
Which paper did you use and what was your printing process?
The cool guys over at Old School Photo Lab made me a very large digital print of the photo from the digital scan. So, while I can’t make a print in the darkroom, I can still stare at a big, pretty copy of the image.
About The Author
David Allen
After dropping out of College to focus on video production and graphic design, I decided to become a strength coach. And, after deciding to no longer be a strength coach, I went back to college. This resulted in a master’s degree in mathematics. Now—while working as a freelance n’importe quoi—I am working in art photography.
You can follow David on social media using the links below and check out his website here.