


Beginners Guide to Processing Film Posted On 30th March 2017 To Beginner Series & Film

Processing your own film can speed up your workflow and give you quicker access to your negatives. It is also typically more cost effective and best of all there is nothing like the sense of satisfaction you will gain by taking control over the full end-to-end process of your photography.
While trying it for the first time might be a daunting prospect, fear not. Below is our guide on what equipment, chemistry and method would be suitable for anyone new to processing films. For more detail, you can download our full pdf guide to processing your first film and watch this short animation. For a more detailed demonstration you can watch this Processing Black and White Film video on our YouTube channel.
Equipment
We would recommend the following equipment to get you started.
- 3 medium size plastic or glass measuring jugs (ideally, they need to measure from 10ml to 1L)
- Thermometer
- Timer
- Plastic or glass bottle with a cap
- Development tank (for example a Paterson Tank or Lab-Box)
- Bottle opener (or film cap remover)
- Chemistry as detailed below
- Stirring spoon (plastic or metal - with a long handle)
- Scissors
- Pegs for hanging the film to dry
We would also advise protective gloves / glasses / clothing.
Chemicals
We offer a range of photo chemicals from paper and film developers to stop bath, fixers, washaid, and toners. However, to process a film you will only need a film developer, stop bath and fixer.
For our recommendations on which chemistry to use and how to prepare them please read our Beginners Guide to Choosing Chemistry for Processing Films.
Film developers
Developers come in powder concentrate and liquid concentrate form. For beginners, the ILFORD SIMPLICTY Photo Chemicals are a great choice as they are pre-measured but if you want to process more than just a couple of films we recommend a liquid concentrate developers such as ILFOTEC DD-X. Note: Liquid chemicals are easier to prepare and use.
As you get more experienced at processing, you may want to switch to a powder concentrate as they can be more economical. Powder developers are initially made up as 'stock solution' which can last up to 6-months. As a result, they can be made in advance of them needing to be used and then used as stock or further diluted (1+1 or 1+3) within the 6-month period.
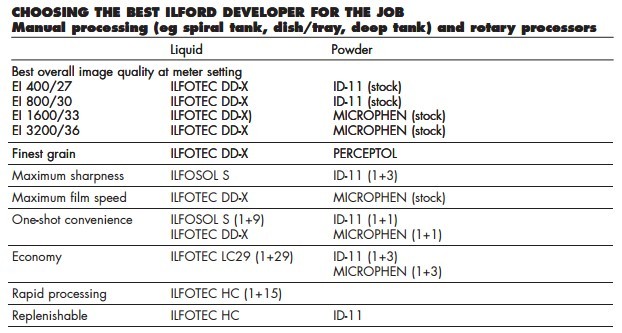
We have a range of film developers suitable for tank processing including: 3 powder developers (ID-11, MICROPHEN and PERCEPTOL) and 5 liquid developers (ILFOTEC DD-X, ILFOSOL 3, ILFOTEC LC29, ILFOTEC HC, and PHENISOL).
While each chemical has its own features and attributes, for beginners, we recommend ILFOTEC DD-X as this will give you the 'best overall performance' with all our films and if you prefer to use a powder concentrate, then we would suggest ID-11.
Details on the other developers and their best/special characteristics can be seen in the table below. We also have technical information sheets for all our chemicals on their product pages.
Stop bath
We only sell one stop bath, ILFOSTOP. This is suitable for all our films and papers and, as it is a liquid concentrate, it is ideal for beginners. Nb. ILFORD SIMPLICTY Stop Bath contains pre-measured ILFOSTOP.
Fixer
We have two options for fixers, RAPID FIXER and HYPAM. We advise beginners to use RAPID FIXER although both options are liquid concentrates and compatible with all ILFORD films and papers so either will work perfectly well. Nb. ILFORD SIMPLICTY Fixer contains pre-measured RAPID FIXER.
The key difference between them is that HYPAM is compatible with a hardener while RAPID FIXER is not. As our films are all sufficiently robust, hardeners are typically not required but some people still prefer to use them.
Mixing photo chemicals
The film developer, stop bath and fixer we recommend for beginners are all liquid concentrate chemistry and as such are easy to prepare. However, we still advise wearing protective glasses and suitable protective clothing.
Chemicals should be handled where there is adequate ventilation and always avoid surfaces where food is kept/prepared. It is well worth taking a few minutes to read our Health and Safety section which gives advice and guidance on the safe use and disposal of chemicals.
When preparing chemicals always check the labels on the bottle and refer to the technical data sheets for each product which can be found on this website. Each chemical needs to be diluted as per the instructions on the bottle and the developing tank you use will advise on the quantity you need to make.
Always ensure the chemical is mixed well when adding the water for dilutions using a stirrer. The added water should be as close as possible to the processing temperature to be used - typically this will be 20C (68F).
For an explanation on how to dilute our recommended chemicals see our beginners guide.
Processing the film
Once the chemicals have been prepared (which you can do in the light) you will need to take your film out of its cartridge and load it onto a spiral/reel before placing it into a developing tank. This stage needs to be done in complete darkness and so we have pulled together some tips to help you master this.
Once the loaded film is in the tank and the tank’s protective lids have been applied you can carry out the remainder of the process in the light. You will need to check the development, stop bath and fixer times for that particular film and developer which can be found in the technical data sheets.
With the chemical solutions all made up to their correct working dilutions and volumes, a timer at the ready, the loaded film can now be processed.
- Start the development by pouring the ILFOTEC DD–X developer solution smoothly, but as quickly as possible, into the tank. The tank should stand in a development dish or tray to collect drips. Start your timer when you finish pouring.
- Fit the sealing cap and turn the tank upside down four times during the first 10 seconds and again for 10 seconds (that is four inversions) at the start of every further minute to agitate the developer. Each time you invert the tank tap it on the bench to dislodge any air bubbles which may have formed on the film.
- Make sure you have checked the development times needed for each film. For example DELTA PROFESSIONAL 100 film needs 10 minutes 30 seconds in ILFOTEC DD–X (1+4) at 20°C/68ºF. Therefore, 15 seconds before the 10 minutes 30 mark is reached, start to pour the developer out of the tank. The timer should come to 10 minutes 30 just as you finish pouring.
- Pour the ILFOSTOP stop bath solution into the tank. Agitate by turning the tank upside down twice. After 10 seconds, pour it out. The time in the stop bath is not critical but it must be at least 10 seconds.
- Next pour in the ILFORD RAPID FIXER solution. Start the clock as you finish pouring, then agitate, as you did during development, until fixation is complete. This will take 3 minutes. Once again, the time is not critical provided it is over 3 minutes. You can pour the fixer into a storage bottle as this can be reused.
- Now the film is fixed you can remove the tank lid. Wash the film in running water (20C/68F) for about 5-10 minutes. Alternatively fill the tank with water at the same temperature as the processing solution and invert it 5 times. Drain the water away and refill then invert the tank 10 times. Finally, drain and refill the tank again then invert it twenty times before draining. Finally do a last rinse adding a few drops of ILFOTOL wetting agent added to the water. This is not essential but does help the film dries quickly and evenly.
Drying
You now need to prepare the film for drying. Lift the film spiral out of the tank and pull the end of the film out of the spiral. Securely attach a wooden or plastic film clip to it (to get a tight grip you may have to double over the end of the film) and then hang the film from a hook or nail which should be at least 2 meters / 6ft 6in off the ground.
Unwind the film out of the grooves of the spiral and remove any excess water by carefully running squeegee tongs or a clean piece of chamois cloth down the length of the film. (Take care as any grit caught up here will scratch the whole film).
Attach a weighted film clip to the bottom end of the film with a developing tray under it for drips. Leave it to dry in a still, dust-free atmosphere. Drying can be speeded up by using a hair-dryer on a low setting, kept moving and about 30cm/1ft away from the shiny side of the film.
Finishing up
When dry, examine the negatives. The film edges (rebates) should be clear, with legible frame numbers along the bottom. A correctly exposed and processed negative should have a full range of tones, with some parts almost clear (like the rebates) and other parts so dense you can only just read print through them. Handle your negatives by the edges only.
Count the negatives: a 36-exposure film may give 37 or 38 pictures. The best way to store them is in filing sheets which take six or seven strips of six negatives, so try to cut them up in this way. (You may be able to drop a blank shot or bad exposure to do this.) Date and label the filing sheet straight away, and they are ready for making prints.
Well done you have processed a film and are now ready to print!