


Reversal Processing Posted On 25th June 2019 To Learning Zone & Film

Turning your negatives into positives
Reversal processing enables black and white transparencies to be produced directly from high quality films such as PAN F Plus, FP4 Plus and DELTA 100 PROFESSIONAL
How it works
It starts with the development of the negative image. This leaves the unused silver halide untouched, but it is not fixed, as it will be used later to form the positive image. After the negative image has been developed, it is totally bleached away using an acid bleach. This leaves the remaining silver which is light-fogged and then re-developed to produce the positive image. Washes are used between the various stages of processing to prevent each new processing solution from contaminating the previous one.
Since we don't provide all the chemicals for this process, these instructions on an information only basis and we can't guarantee final results or offer detailed technical support. We have however tested this process and obtained good results.
IMPORTANT - Health and Safety Information
The processes mentioned in this document suggest the use of chemical substances and/or proprietary chemical preparations. The bleach is strongly acidic, containing sulphuric acid. Concentrated sulphuric acid is highly corrosive. Do not get it into eyes, or onto skin and clothing as it causes severe burns. It may be fatal if swallowed. In case of external contact immediately flush the affected area with water containing sodium bicarbonate. For internal contact get medical attention at once. Always pour the acid into the water, never add water into the acid. Before using these substances, please obtain and study the manufacturers Materials Safety Data Sheets relevant to them. These data sheets are available from the supplier of the chemicals. Please read the Material Safety Data Sheets carefully and observe the safety precautions written in them. In the absence of any specific safety precautions, you should always remember to:
- Work in a well-ventilated area.
- Wear safety glasses, gloves and an apron or overall when handling chemicals.
- Wash your hands thoroughly after handling chemicals.
- Seek medical advice if you feel unwell or if you have come into contact with the chemicals: if seeking medical advice take the chemical container and/or Material Safety Data Sheet with you.
- Never eat, drink or smoke whilst handling the chemicals.
- Store chemicals in cool, dry conditions in appropriate containers away from children, pets and foodstuffs.
Recommended Film
Not all films are suitable for reversal processing, and you should choose your film according to the ultimate contrast required in the final positive image.
PAN F Plus gives bright, high contrast positives and is particularly recommended, FP4 Plus and Delta 100 Professional can also be used. Some trial and error is to be expected in all cases.
We do not recommend reversal processing HP5 Plus or DELTA 400 PROFESSIONAL film as results are likely to exhibit unacceptably low contrast.
Exposure
When exposing films for printing, exposure is not that critical because any variation in negative density can usually be compensated for in printing. When a film is to be reversal processed, exposure must be accurate if good quality transparencies are to be produced.
For general indoor/outdoor use, first adopt the published ISO setting and vary this, by trial and error, to determine the best exposure for your particular taste. In our tests we found 1 stop over exposed to be a good starting point.
Chemicals Required
Reversal processing requires the following chemicals:
- ILFORD PQ UNIVERSAL DEVELOPER
- Sodium thiosulphate
- Potassium permanganate
- Sulphuric acid
- Sodium or potassium metabisulphite
- ILFORD RAPID FIXER or ILFORD HYPAM FIXER
- ILFOTOL WETTING AGENT
- Water
SOLUTION PREPARATION
First Developer
Use ILFORD PQ UNIVERSAL developer diluted 1+5.
To the working strength developer add sodium thiosulphate crystals (Hypo) – as a guide, for PAN F Plus add 8g/l, and for FP4 Plus and 100 DELTA Professional add 12g/l.
Bleach
Two solutions, A and B are mixed as follows:
For solution A add 2g of potassium permanganate to 500ml water.
For solution B add 10ml of concentrated sulphuric acid to 490ml water.
You can use a 10% solution of diluted sulphuric acid if you can't find it concentrated. In this case, add 100ml to 400ml of water to make the part B bleach solution.
These stock solutions will keep for a long period of time before they are mixed together. For use, mix equal parts of A and B, making a fresh working solution for each film, and discard after use.
Clearing solution
Add 25g sodium or potassium metabisulphite to 800ml water. When the sodium or potassium metabisulphite is dissolved make up to 1 litre.
Second developer
ILFORD PQ UNIVERSAL diluted 1+9.
Fixer
ILFORD RAPID FIXER 1+4 or ILFORD HYPAM 1+4.
A hardening fix bath may be beneficial in some circumstances as the bleach bath may soften the film emulsion more than usual. If using a fix hardener then use HYPAM 1+4 with the hardener added.
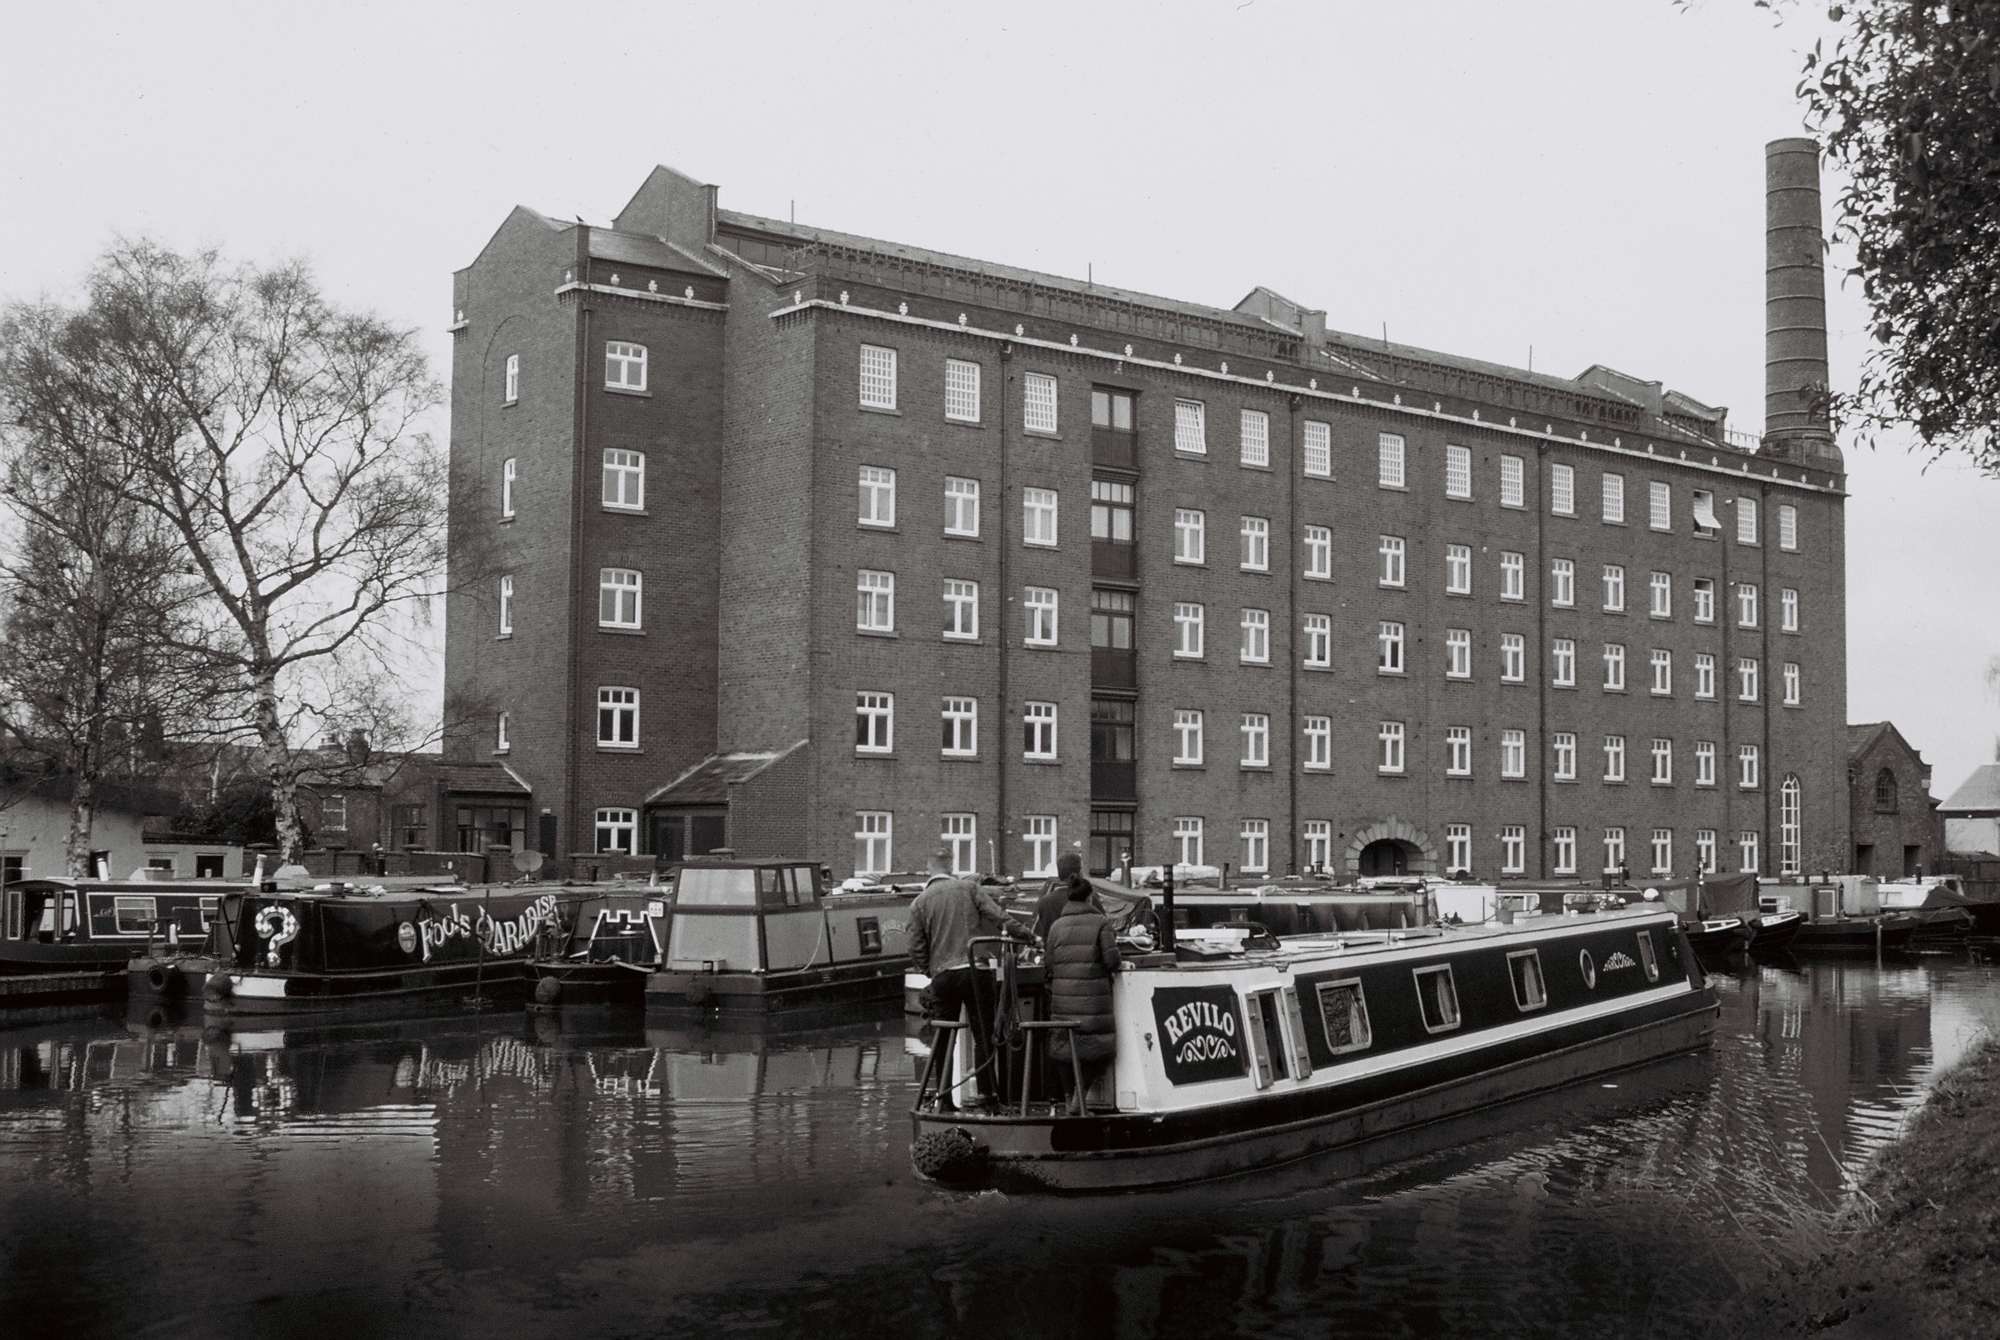
Negative shot on ILFORD Photo PANF ISO 50 black and white film and then reversal processed
PROCESSING NOTES
First Development
The first development time, nominally given as twelve minutes, may be adjusted to determine the optimum developing time for a particular ISO rating. A longer development time will give a lighter image and vice versa.
Here the exposed image is developed to a negative. An ordinary spiral reel and tank is recommended for the first development.
Adjust the temperature of the developer to 20ºC/68ºF. Load the exposed film into the spiral reel and place it into the tank. Fill the tank with the recommended quantity of developer. Invert the tank four times in 10 seconds and tap it on a counter to dislodge any air bubbles from the film. If necessary, place the tank in a water-bath to maintain a constant temperature. Agitate during development by giving a 10 second inversion to the tank every minute followed by a couple of taps on a counter.
We recommend a development time of 12 minutes at 20ºC/68ºF for all the ILFORD films listed. For consistent results it is important to closely monitor the time and temperature. After the required development time, remove the cover from the tank and pour the developer away.
Go immediately to the First Wash step described below.
First wash
Wash the film in running water for 5 minutes. Discard the water and go to the Bleach step.
Bleach
Pour in the bleaching solution at 20ºC/68º. The bleach being strongly acidic stops development almost instantly. You should continue Bleaching for 5 minutes with continuous agitation, or as long as it takes to remove the silver image. This vigorous agitation is necessary to ensure complete bleaching.
The film will be a creamy-yellow colour when all of the silver has been removed.
Carry out the remaining steps in room lighting after bleaching has stopped.
Second wash
Wash film in running water for one minute. Discard the water and go to the Clearing Bath step.
Clearing Bath
The clearing solution removes any yellow staining caused by bleaching.
This is to clear away all traces of the powerful bleaching bath, and the slight stain it leaves behind. Pour the clearing solution into the tank. Treat the film for 2 minutes in the solution, using continuous gentle inversions.
Third wash
Wash film in running water for one minute. Discard water and go to Second Exposure.
Second Exposure
This is a total fogging exposure to make the remaining silver halide develop readily.
Open the tank and remove the film from the spiral reel. Expose both sides of the film for the equivalent of 30-60 seconds at 46cm/18in from a 100-watt tungsten lamp or 30cm/12in from a fluorescent light tube. Insufficient second exposure will result in a reduction in density when the film is finally fixed.
You may safely give 2-4 times the specified exposure, but over exposure beyond this extent may lead to slightly foggy highlights.
Do not expose to sunlight as the film may start to print-out, thus affecting maximum density.
Re-development and fixing
Finally, develop and fix the film according to the instructions below.
Second development
In this step, all the residual silver halide is fully developed to form the positive image. Re-insert the film onto the reel, if the spiral reel employed permits this. (Carrying this our under water may help). If it is not possible to re-insert the film onto the reel then, the second development and subsequent operations may be carried out in a dish/tray by using a ‘see-saw method’.
**Appropriate protective gloves must be worn while performing the ‘see-saw’ method.
Using a freshly mixed developer solution, develop the film for 6 minutes at 20ºC/68ºF. Development time is not critical and should be continued until maximum density is achieved. After development, discard the used developer.
Fourth wash
Wash film in running water for one minute. Discard water and go to Fixing.
Fixing
This is an optional stage which removes any last traces of silver halide that did not develop and leaves the image clean and fully transparent in the clear parts.
Pour in the fixing bath and fix for 5 minutes with intermittent agitation. This removes any insensitive silver halide in the highlights.
Fifth wash
Wash film in running water for one minute. Discard water.
Drying transparencies
After washing, give the film a final rinse in water containing ILFORD ILFOTOL Wetting Agent (1+200). Now hang the film to dry.
Mounting and Projection
Once the film is dry it is ready for projection and can be mounted in cardboard mounts or between glass.
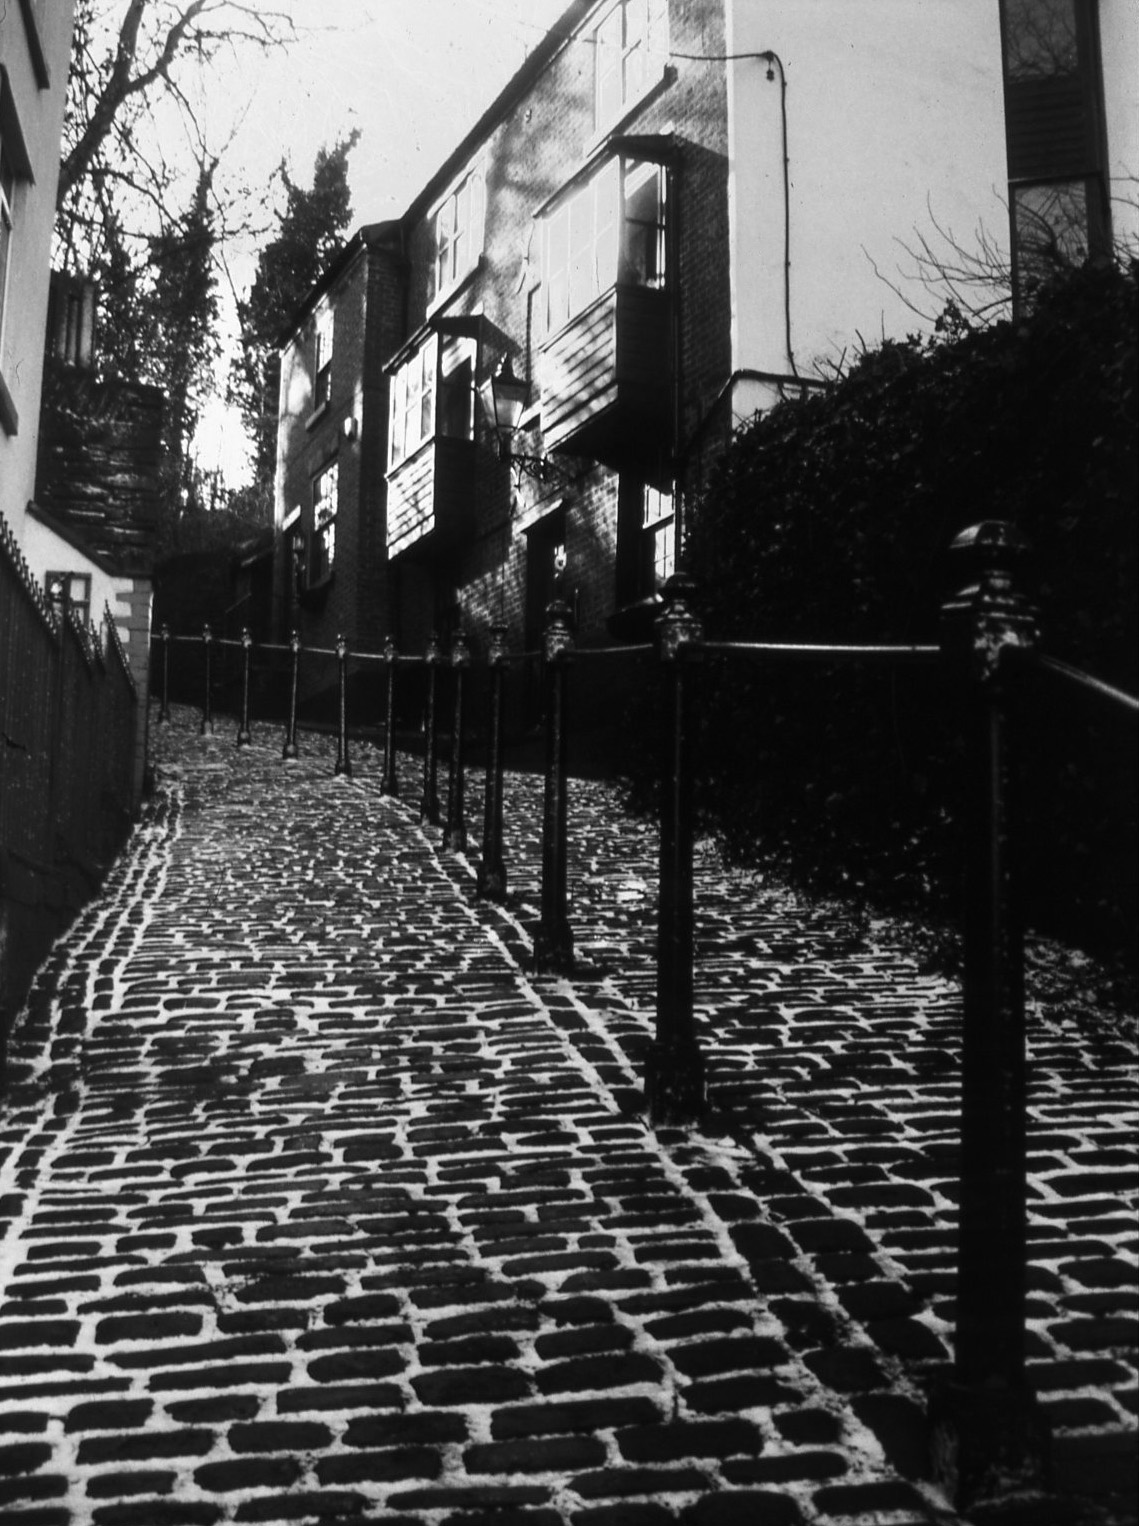
Negative shot on ILFORD Photo PANF ISO 50 black and white film and then reversal processed
The Reversal Process at a Glance
|
Processing Steps |
Time (min:sec) |
Comments |
|
First Development |
12:00 |
May be adjusted to give optimum time for particular ISO rating. A longer development time will give a lighter image and a shorter development time will give a darker image. |
|
1st Wash |
5:00 |
Preferably running water |
|
Bleach |
5:00 |
Strong acid stops development immediately: Extend time if necessary, for full bleaching: continuous agitation |
|
2nd Wash / Rinse |
1:00 |
|
|
Clearing Bath |
2:00 |
Clearing solution removes any yellow staining caused by bleaching |
|
3rd Wash / Rinse |
1:00 |
|
|
Second Exposure |
1:00 per side |
See Processing Notes |
|
Second Development |
6:00 |
Development as for normal black and white processing |
|
4th Wash / Rinse |
1:00 |
|
|
Fix |
5:00 |
Fixing as for normal black and white processing |
|
5th Wash |
10:00 |
Running water |
|
Rinse and Dry |
|
PDF Download
A .pdf of this sequence can be downloaded here